Just popping in to share a post that I wrote this week for Imagine Gnats. I’m happy to be a new contributor to their blog, and I was excited to dive back into some kid sewing for my first post- I used three Hey June patterns and I love them! Check my post out here if you’d like, and make sure to browse the fantastic selection of fabrics- one of my favorite shops for sure. 🙂
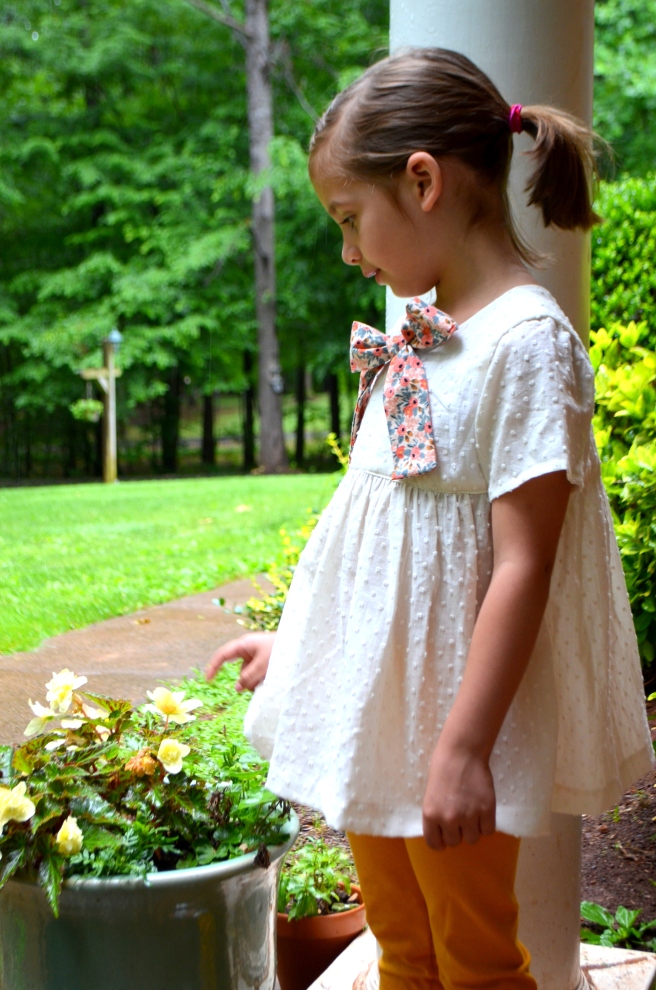
Today kicks off the Cleo Summer Showcase, and I’m excited about this one because I feel this pattern and style is for anyone and everyone! Cleo is a great staple skirt pattern (and pretty quick sew) from our sewing guru, Rae.
You can read all about Cleo here, but to sum it up for you, this gathered skirt features a flat-front waistband, elastic at the back, pockets, optional contrast ham band, and two lengths.
Wait, did someone say pockets?
Moms need pockets. Kids need moms to have pockets. Because candy wrappers, hair ties, old band-aids, pebbles, matchbox cars, dirty/lucky pennies, rotten acorns….
The fabric I used is from Anna Maria Horner’s Loominous collection, which features yarn-dyed cotton in really beautiful colorways. Super light and airy, this stuff is. Perfect for a Summertime skirt. I chose to make mine in the longer length, and I’m very pleased… oh, and I did add a couple of extra inches to accommodate for my height.
Changing your Cleo up from casual to fancy is as simple as fabric choice. Rae has so many different versions on her blog that you’ve got to check out: Gingham (my fave!), a beautiful Cleo made in Liberty, and a green maxi she made years ago before Cleo was a thing.
I had the sweetest photo assistant, and I can’t resist giving him some face time here on the old blog. Love that boy.
Thanks Rae, for inviting me along. I’m already dreaming up some cooler weather Cleos!
You can follow along the Cleo Summer Showcase all week. Take a look at this line-up, find your inspiration, and grab your copy of the Cleo skirt!
About 5 years ago, Made by Rae released her Geranium dress pattern for girls, and it quickly became the must-sew dress for all mom sewers everywhere. I think I have made upwards of 50 Geraniums since it’s release- several for my girls, many for custom orders and friends. Its my standby. It can be casual, it can be fancy. I always keep it close. It’s actually the only one of my patterns that is kept in a purple folder so that I can find it in quickly.
Rae asked me a few weeks ago to help test her newest baby, the Geranium Expansion Pack (known as Geranium XP). This pattern supplements the original Geranium pattern (OG) by adding many new options. First of all, sleeves! 3 different lengths, puffed, fitted, gathered, oh my! There’s a zipper option, extended bodice option, neck bow, sash, hem band, peter pan collar… Just head over to Rae’s site to read all about and see all of the amazing variations she’s made. Can I say this probably the only dress pattern you need?
I decided to test the short fitted sleeve option and the bow, in the tunic length. The pattern details are all there, and the directions are what you expect from Rae- perfectly understandable and clear.
The neck bow is cleverly inserted in the sides of the U-cut out from the OG- brillz!
I will say, I was nervous to do the fitted sleeve. I thought it just might be too fitted for my wiggly child, but really it fits so nicely! Especially in this lightweight swiss dot. I used some leftover Rifle paper co. scraps to make my neck bow, and while I’m happy with the end result, I think next time I’d pick a contrast fabric that is the same weight or lighter than the main fabric. It just felt a little tricky to sew between the swiss dot layers, and hangs just a bit “heavier” than I’d like, but, still so adorable!
Since I’m wimpy, I chose to make the button-up back closure. Though I’d like to attempt a zipper again (I’ve only sewn a couple).
Okay friends, time to get your XP so you can make one of the possible 2,000 (i know- who knows how to do math like that?) Geranium variations.
Thanks for coming by and special thanks to Rae for continuing to inspire us to sew all the things!
Apologies first, for the side of Willie Nelson eye contact. Grant’s room gets the best light in the house. Do you think he’s stoned in that pic? Has Tori Spelling had a nose job? Is the sky blue? I’ll let you be the judge.
Here’s another Isla for you, dress-form this time. You can find this great pattern here.
I’ll show you how I modified it into a maxi using these 5 steps:
Just kidding! I added like, 20″ or so to the skirt, which I also cut wider so it would be more fully gathered. Oh, and I didn’t hem this because I didn’t feel like it and also, #knitdontfray.
Shazam! Maxi!
I really love this pattern. As you loyal readers know, I always lengthen my patterns to accommodate my amazonian height. Here, I added approximately 2″ of length to the bodice. I may even add 1/2″ or so next time since this seam is hitting just above my natural waist.
I used my cheater binding method for both the neckline and the armholes, and it really turned out nicely. No measuring required. You should try it sometime.
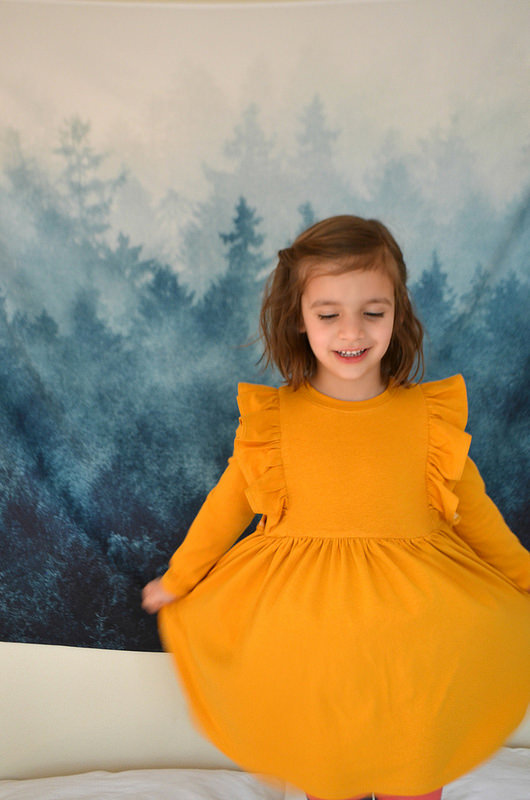
This knit fabric has become my new standby. I feel like I’m leading you to my secret mushroom hunting spot, but it’s okay because we’re pals- just don’t buy it all, and don’t tell anyone else about it, ok? It’s a cotton/lycra blend from the Peek-a-boo fabric shop, and it’s just really nice stuff for the price- you really cannot beat $7/yard these days. I also used the dark teal here for Coco’s ballet back dress, and here in the gold mustard for the Millie dress. I’d say it’s similar to Kaufman Laguna knits if you’re familiar with those, but better In my opinion? Stretchy but sturdy, and very vibrant color in person. I have now bought about 6 different colors and I’m in love with all of them.
Please excuse the wrinkles. This dress was in a literal ball on my closet floor before I put it on.
I feel like there are two types of people in this world.
Those who like ruffles, and those who don’t.
I happen to love them (in the right context, that is. I simply cannot condone many of these, sorrynotsorry).
The Millie dress kept showing up in my Instagram feed in all it’s ruffled glory, and despite having almost no time to sew lately… I had to make one.
This is a free pattern in sizes 3-6. There are no diagrams, no tutorials to guide you- just a simple set of instructions. But, If you have sewn a dress before, and have gathered some fabric to make a ruffle, you can make this.
I made a size 5, with a size 6 length and am really happy with the fit- this dress is intended to be above the knee. Coco is proving to be taking after me in the height department, so I generally have to lengthen things for her.
I chose to make a regular neckband using my usual cheater technique, since I wasn’t liking the idea of just folding the neckline under and topstitching as the pattern suggested. I felt like that would’ve made the neckline stretch out or gape, but what do I know….
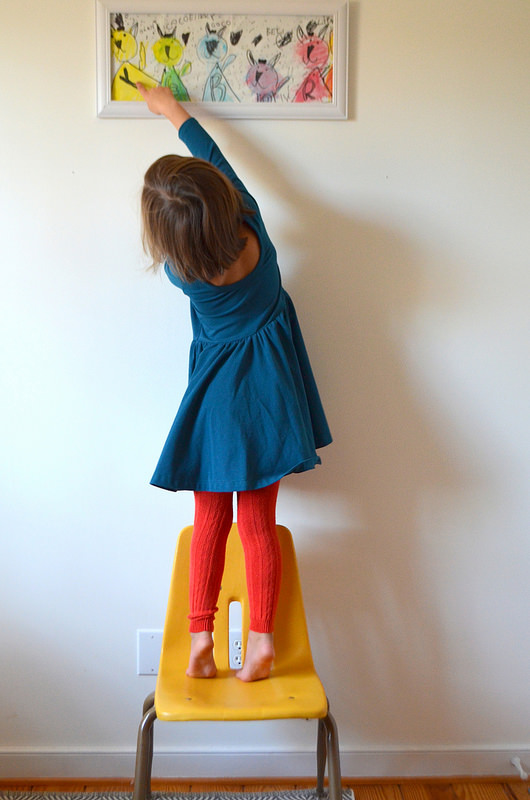
Coco was busting out some of the Yoga moves she learns at preschool. Girl’s got some balance! She says this one is called Tree pose. I’m no yogi, so I’ll take her word for it.
For my Coco, I made the gathered skirt with ballet back and long sleeves- though I cut a few inches off the sleeve because I’m into this “cropped long sleeve” that I’ve been seeing around lately.
I made a size 5 (Corinne is a tall and lean 4 1/2 year old) and I’m really loving the fit on her. But, let’s talk about this darling back neckline… it’s just so sweet on her little bony body! I’m dying…
I used a fantastic cotton lycra knit from Peek-a-boo pattern shop. This was my first time ordering from Amy, and along with this dark teal (i’m currently obsessed with this shade of blue!), I purchased a dark coral and a mustard color… All fabrics are vibrant in color, nice and stretchy, but also sturdy. Sewing with it went as smoothly as I could’ve hoped.
Oh, I should mention that I didn’t completely follow the neckband instructions. Once I added the neckband, I felt like it was too wide for a delicate little dress, so I then folded the neckband down towards the front and topstitched. I’d say this looks more like a leotard neckband would be finished…
A little hard to see in the photo, but I’m really happy with it.
If you follow me on Instagram, you might’ve seen another version I made for big sister Ellery that has an un-gathered skirt and a cowl neck. Really hoping I can convince Ell to let me take some pics of it on her because it’s pretty sweet!
Speaking of big sis, she gets SO into Christmas- last week when I brought out our decorations and wrapping stuff, she immediately started wrapping up “presents” for the family and putting them under the tree. Coco asked if she could open hers, so Ellery handed her the giant gift bag with 25 pieces of tissue paper, and Coco got SO excited. She pulled out an old little pair of her own sunglasses, held them up, and said “ugh… this is a WE-GIFT!!!” and threw them back in the bag.
Coco is working on getting thsoe R’s right! Anyway, it was adorable.
Let’s end this post with a few classic Coco faces. She is incredibly silly and I had to weed through about 50 goofy poses and expressions to get some pics for the blog.
My Isla is the peplum top variation, but I love the dress versions that Rae has made (especially this one!) so I hope to give that try too. Anyway, it’s cute, right? This pattern is pretty simple- I sewed (mostly serged) mine in about an hour while Coco and her cousin Wes happily played babies in the next room.
I used my easy and fast neckband tutorial for the arm holes and neckline.
I made a size L, but as usual lengthened the bodice by about 3/4″, and the skirt piece by about an inch… I did not hem this, and there’s no way I could’ve gotten away with it anyway. It’s definitely a bit short- the peplum piece is supposed to hit right at your natural waist, and my waist is probably an inch lower. That’s okay though. A wearable muslin works for me. I’ll change it up next time around.
Are you dying to know where I got this amazing fabric?
WELL… I was at Goodwill the other morning- sometimes between dropping the big kids off at school and dropping Coco off at preschool an hour later, we go to random places that are open at 8 am (Grocery stores, Tractor Supply (because chickens), Lowes, or Goodwill). Anyway, a yard and a half of this colorful print was just sitting folded up nicely on the shelf. Mine for 20 cents. Bada-bing!
Made of 100% luxurious indie (not!) polyester… tee hee!
Seriously though, I am loving the drape. So easy to sew with. And it’s pretty darn comfortable. I’d be nice if it were a little more breathable.
How did people survive the seventies? GAWD!
I like to pair this with my 100% pilly acrylic Target cardigan.
Love y’all!
-Erin
p.s. Caroline and I were recently featured on Rae’s blog for her Sewing Superstars series… We love Rae and her patterns, so we were so honored to be featured. You can check it out here!
My good friend Taylor is having a baby in a hot minute, and she asked me a while back if I’d be interested in making her new little girl a coming home outfit. Taylor and her family are some of my favorite people, and you know I love babies, so of course I was happy to. Plus, T-bone (as I like to call her) loves handmades and has always been so sweet about our makes on this blog. She was even like, “oh, and tell me what I owe you.”
UM… NO FRIEND. JUST NO.
She gave me instructions to make whatever I wanted (sweet!), and I texted her pictures of cozy organic knit fabrics. She picked one instantly, and I got to work like 3 months later and 3 days before the baby’s due date.
Because SUMMER WITH 3 KIDS, that’s why.
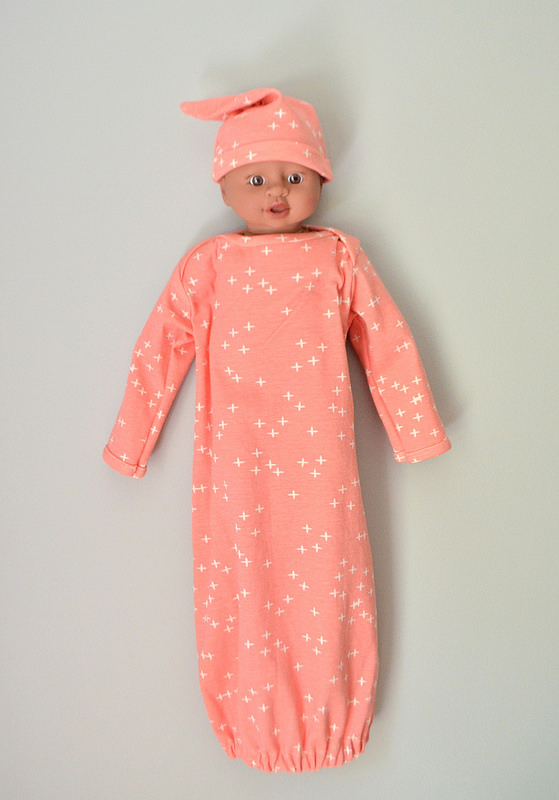
I knew right away I’d be making Rachel’s newborn gown pattern. It’s perfect in every way, and was not a long project at all. I love the envelope neckline, and the way the binding looks so professional. Oh and the pattern is free, so if that doesn’t rope you in, maybe getting pregnant will? 😉
The fabric is organic interlock knit by Birch. Nice stuff. It’s really easy to work with, and the color is a lovely peachy pink.
As soon as the gown was finished, I knew it needed a matching cap, so I scoured the internets for a quick tutorial and pattern. There are several, but my printer didn’t like any of them so I drew up my own little pattern.
Super easy, just serged two pieces together, turned them right side out, and folded up and stitched a little cuff. I was originally going to tie the top of the cap into a knot, but it was virtually impossible, so I kept it more like a pixie shape.
And, I think it’s super cute like that.
Coco’s baby doll was a decent model. She’s a little dead in the eyes though.
I can’t wait to see meet baby Harris. If she’s anything like her adorable older sister and brother, she will capture hearts instantly.
About a year ago, I was sewing up lots of knit tanks and tees for my kids and wasn’t pleased with the neckband process and outcomes.
Generally, there are two ways that a pattern will instruct you to go about the neckband. The first, is to cut your long neckband piece into an exact measurement suggested in the pattern. You sew together the short ends to create a circle, then fold the piece in half, and then pin it all the way around the raw edge of the neck opening. Then as you sew, you hope that it will look evenly stretched all the way around. But if you’re like me, you get towards the end and have to stretch the neckband like hell because somewhere along the way, you didn’t line up quite right. This method, if you’re good at it, looks great when it’s finished. But, for me it always includes lots of bottom-lip biting, cursing, and seam ripping. I just can’t get down with it.
So much depends on what type of knit you are using. And since there are so many types of knits out there, this method can be tricky and is not really a one-size fits all… You really have to take in consideration how stretchy your neckband fabric is.
Here is photographic evidence of the only time I succeeded almost perfectly at the above method. I was so happy that day.
The second popular way, is to attach the front and back of the shirt at only ONE of the shoulder seams. Then, you cut your long neckband piece, fold it over, and begin sewing starting from the edge of one of the (unsewn) shoulders, all the way around to the other end of the other (unsewn) shoulder. Then, you simply put your shirt right sides together, and sew that shoulder seam together. This is easy, but the finish is not usually nice looking. It’s a cheater method, that comes out looking like you cheated. I’m not too good for it- I do it a lot, but I usually regret it once all is said and done. So I’m saying buh-bye to this method too.
Here are a couple of examples that the second method ends up looking like:
This is my Out & About Dress which I love, but hate that I finished the neckband this way. I was straight-up lazy and I pay for it every time I wear my hair up and show everyone my one ugly shoulder seam.
This is an unblogged raglan dress, but you can see what I mean, right? It’s bulky. Yuck.
So anyway, I played around one day by marrying these two methods, and came up with this method. There is no math and no measuring involved here, ladies. You’re welcome. This way is perfect for those of us who enjoy a little spontaneity and freedom in our sewing, but also want our garments to look legit and professional. Now, I’m SURE I didn’t invent this (in fact, if you’ve ever sewn binding to a quilt, you may have done it very similarly to this), but I haven’t found a tutorial out there, so if you know of a good tutorial or video reference out there for this, please link it up in the comments for all to see!
We’ll call this the Wing-it Method, k? And like most methods, this gets easier with every neckband… it’s my fave. Also, please excuse the terribly lit iPhone pics… I decided to snap photos of this last minute one day, but I hope can get the gist of this.
Step one:
You’ve sewn the front and back of your shirt together already, at both shoulder seams. Now, you will cut your neckband length a couple of inches longer than suggested in your pattern, giving yourself some wiggle room to work with it.
You will sew/serge it on starting at one point on the back of your shirt (some like their neckband seam to be in the center, some prefer it closer to the shoulder. do whatever you like), leaving a decent sized “tail” of fabric. Sew your neckband to the raw edge like normal, stretching the neckband piece nicely as you go (this takes some practice, getting it stretched evenly). When you get a couple of inches away from where you started, STOP. Leave a tail there too.
Here’s what it looks like on the inside:
Next, you’re going to use your best judgement, about how much of the neckband tails you’ll need to cut off. We will be sewing the two open raw ends together and then folding the neckband back over and sewing it to the shirt. So, you’ll just need to take a minute and decide what will work (hey, I said this is going to be spontaneous).
This method is all about FEELING! You need to do what’s right for your shirt, and since stretch can vary from knit to knit, you need to remember that.
So, go ahead and trim the tail, but keep in mind that we will be sewing them together with a 1/2″ seam. So just take that all into account.
Okay, next you will open those two tails up and put them right sides together.
Sew those puppies with a 1/2″ seam. Or whatever inch seam you want. It’s your shirt.
Good. Now below, you will see that I’ve got it almost finished. Just need to sew that gap closed.
Just sew it as you normally would to close it up.
Voila!
Looks clean and even, just like the first method we talked about. But, you didn’t have to get angry at your shirt, yell at your kids for no reason, or even pull out the seam ripper.
When I made my first Beatrix top, I was excited to realize that the shirt would fit over my head without having to unbutton it- I’ve wanted a simple woven tee pattern for a while (I had been thinking of buying the Scout tee pattern by Grainline), so I figured I’d try using the Beatrix pattern and omit the button placket down the back. Since it’s got a short sleeve option, I was in business.
I did a couple of things here to jazz my tee up. I added a few small pleats to the center front, and one larger pleat at the center back. I sewed them 1/2 way down the shirt, and I like that it gives it a little more flow.
(update: I forgot to mention this originally but had a couple of comments about it… I did add about 2″ to the front center so I could make the pleats. Also, I cut the back piece on the fold (instead of 2 pieces as the original pattern has), and basically “made up” for the button placket being gone, by putting in one large pleat.)
Also, instead of a facing like the original Beatrix has, I used bias tape to finish the inside of the neckline. I really prefer the feeling of that to facings. They just annoy me.
Oh, and of course if you read this blog, you’ll know that (say it with me now…) I added some length because i’m tall. 🙂
I love Leah’s desgins. Her color combinations are interesting , and her prints are not obnoxious or in-your-face… yet there is still a lot to look at. I feel like her prints are great for grown-ups and kids alike. Her designs have an overall cool vibe and I need more of them in my life!
Want some cheese??
If you don’t own the Beatrix pattern, i recommend it. Rae has so many variations that she’s made and I love them all. So much inspiration there.


 So, go ahead and trim the tail, but keep in mind that we will be sewing them together with a 1/2″ seam. So just take that all into account.


